We do have more information about the Teddy Bear that was stolen. Here is the description: (please see my post from yesterday)
The bear had light
tan mohair fur,was dressed in a micro light blue and white check
with a white sailor collar that extended over his back and
shoulders. He had a little hump back because he was seated. One
of his paws had a little embroidery mark on it, a small flower.
He was about 3" seated and his silhouette was pear shaped because
he was a little bottom heavy. I think the maker was Lorraine
Gardner, but I am not sure. Lorraine Gardner made beautiful
miniature bears and rabbits with swivel arms, legs and heads.
I need to have somebody send me a really good picture of this
exhibit, where they had taken the picture Saturday morning. A
teddy bear was stolen from the exhibit Saturday afternoon that
was sitting in the white chair next to the front door. The
exhibit belongs to Rhona Lee, and needless to say she is
heartbroken. The bear was very expensive, and she had been saving
him to include in a special project. She does not have a picture
of him, so I was hoping one of you had taken a good picture of
the exhibit Saturday morning that shows the bear. Rhona doesn't
care who did it, she just wants the bear returned.
Rhona's address is (she gave me permission to give it out):
Rhona Lee
1455 Welburn Ave
Gilroy, CA 95020
408-847-2065 rhonalee@aol.com <mailto:rhonalee@aol.com>
We also do have a picture although it's small and you will have to go here to see it
https://conniesauve.shutterfly.com/7044
If any of my followers would be able to take a few minutes to put this message on your blog, it would be appreciated. Teddy wants to go home!
Til next time
Diane

Friday, October 25, 2013
Thursday, October 24, 2013
The "Naturals" Part 2
Shells, shells, and more shells. Can you tell from my blog background that I love shells? But before I continue, I want to say that most of the minis I'll be showing were not from any beach I went to. I had to purchase most of them. Some beaches are great for shelling, others are not. I have never found a coral, sand dollar, starfish, seahorse, driftwood or sponge washed up on any shore. I have found shark's teeth, clam and scallop shells, black mother of pearl, snails and a variety of "conch" type shells. Never the less, I want to show you what I made.

These 3 plaques are made out of Fimo I varigated to look like colors of the ocean. On the largest one, I put my last seahorse. It's a little less than an 1" and my very favorite "shell" The next one is the smallest sand dollar I have left.and is about 5/8" long. On the last plaque is a snail, sponge, a cone type shell and a starfish. The starfish is 1/4" wide and I have never found any other quite as small.
 To give you an idea how small the clam shells are:


These 3 plaques are made out of Fimo I varigated to look like colors of the ocean. On the largest one, I put my last seahorse. It's a little less than an 1" and my very favorite "shell" The next one is the smallest sand dollar I have left.and is about 5/8" long. On the last plaque is a snail, sponge, a cone type shell and a starfish. The starfish is 1/4" wide and I have never found any other quite as small.


Next, a picture is of my real sponge that I bought off of a sponge fisherman from Tarpon Springs (Florida).

My sponge in miniature.

These last two pictures are from some previous posts showing how many minis I was able to make ( Please see post about "Matty's Blue Seas Bistro, 1,2, and 3 )
I hope you've enjoyed this post and maybe have gotten some inspirations on working with shells.
Unfortunately, I am ending this post on a "sour note" It appear that there has been another stolen miniature.
Here is the post from one of my mini groups and I do have permission to post it here.
A teddy bear was stolen from the exhibit Saturday afternoon that was sitting in the white chair next to the front door. The exhibit belongs to Rhona Lee, and needless to say she is heartbroken. The bear was very expensive, and she had been saving him to include in a special project. She does not have a picture of him, so I was hoping one of you had taken a good picture of the exhibit Saturday morning that shows the bear. I would like to post a picture of the bear online and hopefully she will be able to get him back. Rhona doesn't care who did it, she just wants the bear returned. I will post a picture of the bear if I receive one.
Rhona's address is (she gave me permission to give it out):
Rhona Lee
1455 Welburn Ave
Gilroy, CA 95020
408-847-2065
Taken from the Good Sam show October 12,13 in San Jose. Ca. So, this is a plea to the person who took this teddy. Please return it. Just think how good you will feel, when working on your minis, knowing that you did the right thing
Till next time
Diane
Monday, October 14, 2013
The "Naturals" - Part 1
Being a "Trash to Treasures person", I am always on the lookout for all sorts of supplies, courtesy of Mother Nature. Every state has all sorts of natural ingredients that can be adapted to miniatures. But when I lived in Illinois, for some reason, I never really bother to look for them. But since I moved to Florida, I found a whole "nother" world.
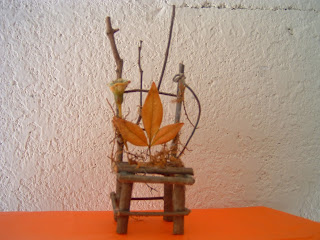
The fairy chair I received in a swap a while back but didn't come with the leaf back. I added that yesterday to dress it up a little. This is where I got it from.
 I don't know what this bush is called but I named the "garbage tree" Even when its trimmed up, it still looks kind of shabby.. Very popular here in Florida. But look what I got from it


The neat thing about this bush is that the leaves turn colors throughout the whole year and they come it all sizes. The smallest ones are perfect scale for any fall scene you may want to do.
And here's how you preserve them
You will need 2 pressing cloths ( I think any scrap piece of fabric will do)
Two pieces of wax paper
Leaves
Iron
Lay down one pressing cloth. Lay 1 sheet of wax paper on top. Then lay your leaf on top that. Now lay the 2nd piece of wax paper on top of the leaf. Finally, the 2nd pressing cloth goes on top the wax paper.
Set you iron on DRY HEAT- low temperature. Now, just start ironing, using a circular motion (don't forget the stem) It will take about 8-10 seconds. When done, immediately separate the layers and gently remove the leaf. What you've done basically is coat the leaf in wax to preserve it. I'm not sure how long it will last but I should think quite a long time.
But Wait! There's more! I also got these:


The seeds dry on the stem and turn into "miniature apples" Perfect size and color.
.


The fairy chair I received in a swap a while back but didn't come with the leaf back. I added that yesterday to dress it up a little. This is where I got it from.


The neat thing about this bush is that the leaves turn colors throughout the whole year and they come it all sizes. The smallest ones are perfect scale for any fall scene you may want to do.
And here's how you preserve them
You will need 2 pressing cloths ( I think any scrap piece of fabric will do)
Two pieces of wax paper
Leaves
Iron
Lay down one pressing cloth. Lay 1 sheet of wax paper on top. Then lay your leaf on top that. Now lay the 2nd piece of wax paper on top of the leaf. Finally, the 2nd pressing cloth goes on top the wax paper.
Set you iron on DRY HEAT- low temperature. Now, just start ironing, using a circular motion (don't forget the stem) It will take about 8-10 seconds. When done, immediately separate the layers and gently remove the leaf. What you've done basically is coat the leaf in wax to preserve it. I'm not sure how long it will last but I should think quite a long time.
But Wait! There's more! I also got these:


The seeds dry on the stem and turn into "miniature apples" Perfect size and color.
.
And finally this

This is the stem that the seeds come off of. I intend to use this as a filler in a bouquet. All I have to do is put on a dot of white paint on the ends and trim it up. Kind of like Queen Ann's Lace.
I hope this post gave you some ideas on using natural material in you minis. The best thing is that it's a renewable resource!
Til Next Time
Diane
Tuesday, October 1, 2013
For Halloween...
Finally finished this room box last night and I have to say that it was really fun to do Room boxes can be addictive so I just may have to make a lot more than I planned
First, the inside- This was the easiest part to do and turned out pretty much like I planned. I think it shows off most (but not all) of my Halloween minis along with some fall decor. I have plans for the remaining minis and will be working on that scenario next


The outside lid took the longest.
I experimented with the colors. I had 6 shades of gray (not 50 like the book, just 6) and after deciding on the main color, I used the others as accents. I practiced making the stormcloud freehand on scrape paper and when it was do-able, I was able to copy it to the lid. I did use some chalk pastels for blending. The lightening is embroidery floss, stiffened, shaped and glued on.
The witch is free clip art printed off my computer and decoupaged on.
 The bats are plastic from a "Mardi Gras" type necklace we got last year at a party, They're a bit large but I consider them "mega-bats"
 Here is a close up of the lightening.
For the inside lid- same color gray as the outside and I added another moon. Two of the more unique
minis you see here are a wonderful door and a rock with a face- a talking rock Cool.
The ghosts are tissue paper and are opaque. You can kind of see thought them, which is what I wanted.
Now, not only have I taken my swaps and gifts out into daylight again, but I've made myself some extra room. All in all, I am very pleased. Hope you like it!
My next project is well underway and I hope to have it done in the next few days. So until next time, take care
Diane
First, the inside- This was the easiest part to do and turned out pretty much like I planned. I think it shows off most (but not all) of my Halloween minis along with some fall decor. I have plans for the remaining minis and will be working on that scenario next


The outside lid took the longest.
I experimented with the colors. I had 6 shades of gray (not 50 like the book, just 6) and after deciding on the main color, I used the others as accents. I practiced making the stormcloud freehand on scrape paper and when it was do-able, I was able to copy it to the lid. I did use some chalk pastels for blending. The lightening is embroidery floss, stiffened, shaped and glued on.
The witch is free clip art printed off my computer and decoupaged on.
 The bats are plastic from a "Mardi Gras" type necklace we got last year at a party, They're a bit large but I consider them "mega-bats"
For the inside lid- same color gray as the outside and I added another moon. Two of the more unique
minis you see here are a wonderful door and a rock with a face- a talking rock Cool.


The ghosts are tissue paper and are opaque. You can kind of see thought them, which is what I wanted.
Now, not only have I taken my swaps and gifts out into daylight again, but I've made myself some extra room. All in all, I am very pleased. Hope you like it!
My next project is well underway and I hope to have it done in the next few days. So until next time, take care
Diane
Subscribe to:
Posts (Atom)