Friday, December 25, 2015

My Husband's Christmas Minis


The most wonderful day of the year is finally here and I'm stopping by to wish everyone a very Merry Christmas and Happy New Year!

But before I go, I wanted to show you my husband's minis. The truck is from a co-work friend of his and he got it many years ago. I don't know what scale it is but I thought it  would look nice with a wreath in front or maybe a garland along the sides. I looked at it once and then saw a look on my husband's face that said "don't touch" so I left it alone.
But the other 2 Christmas minis are a different story.  They both were ornaments I hung on the tree.
One year as I was putting my Christmas decorations away, I noticed they were missing but wasn't to worried about it-they'd show up somewhere. Sure enough they did and this is where I found them.

The Santa was here.


And the sleigh


They disappear each each year only to re-appear the next.  I think my husband now has permanent custodianship and that's find with me.

From our house to yours

Merry Christmas!

Saturday, December 19, 2015

Beaded Angel


Hello everyone! I hope you are beginning to enjoy the holiday season.  I am really surprised that for 2 years in a row, I am ready. That is quite an accomplishment for me!

I decided to make angels using straight pin type jewelry findings instead of beading wire.  They may take a little longer because of the drying time but I really enjoyed this method.

You will need:

2 larger gold sequins
gold glitter- very fine
14 small beads for the dress
1 larger bead for the head
4 rice beads
6 straight pin findings
wire cutters
tweezers
craft glue for glitter
superglue (you could probably use craft glue but that takes longer to dry and not quite as sturdy)


String beads on wires as shown below and secure in place with super glue.

Once the glue dries, trim off the excess wire as close as you can to the beads. Then, carefully using superglue, glue together as shown.


While that's drying take one sequin and cut in half. Apply craft glue to both halves then glitter and let dry. Leaving the other sequin whole, apply glue and glitter.


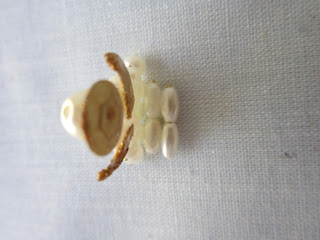
Now comes the fun part. Using craft glue, glue the whole sequin to the back head of the angel (for the halo)
Then add the halves as wings. I had to do this as a two step process because it helps to have the halo dry.  I also decided to use craft glue because I wasn't too sure how superglue would stick to glitter. 
Final step is to superglue the rice beads to the back of the angel at the base.  Be sure to tilt the angel very slightly backwards,
You should end up with something like this:

I have made 2 of these so far and  have no plans to make more (for this year at least) In fact, this will probably be the last mini I make before Christmas. I will be spending the rest of the time putting together little scenarios on  how I want to display the minis in my Christmas shop.  Hopefully, I'll have some pics soon.

Hope you enjoyed thus tutorial. So, til next time, have a wonderful day.

Diane


Wednesday, October 28, 2015

Halloween and other stuff


Hello, hello, hello! I hope everyone is doing well. We just got back from a much needed vacation, visiting the kids, grandkids and family up north ( Chicago area) so I'm in a very good mood. It was actually nice to dress in a sweatshirt ,levis, socks and shoes and sit around a campfire. But because we were gone for nearly a month, I'm afraid my Halloween offering is a little slim this year.

This picture is a little scene I put together last year and was able to fit in most of my Halloween minis.

But there are two other minis that didn't fit so here they are.


 I really enjoy this spooky tree because the eyes and mouth are wired to light up.  And the smile on the pumpkin is really cute.  I have them setting in my den as a display for anyone who comes by to see.  Unfortunately, I don't thinks anyone will come by-at least not trick or treaters.  We live in a somewhat isolated area in ours subdivision with 4 other neighbors and there are simply no kids close enough who want to come out our way. So no more pumpkin carving or outdoor displays. But at least I can enjoy Halloween indoors with my minis.

After Halloween, this tree and pumpkin will go into a different scenario. Along with some other things that I have no immediate plans for, I have been toying with an idea of making an outdoor scene that I'm calling the... Yard Art Emporium!


 Yard art is very popular in my area probably because the weather is so nice year round. Most of these minis are to scale, just large objects. Now all I have to do is make an awning, figure what type of base to put it on and whether or not to add some concrete statues and fountains.  Needless to say, this isn't going to be done anytime soon.

.I know I said I'd have some tuts ready for this post, french hook earrings and a beaded angel, but the pictures didn't turn out very well.  So I'll be retaking them tomorrow and will post again as soon as I can. Sorry about that.

Please have a great Halloween and be safe!

Diane

Wednesday, September 23, 2015

About Christmas

While some of my UFOs are drying, I decided to put together a Christmas display using one of my few remaining Michael's hutches.  This display is not permanent, just a dry run.

So far, I really like it except for the angel on the glass tray.  It sticks over the edge a little bit so I might replace it.  Have to think about it for a while.

Then I got together all my perfume trays.  I have about 3 more that I haven't taken a pictures of yet. Most of these will go on a table display (which is still drying.)
The one on the left is one I made using a unique tray I received in a swap.  It;s supposed to be mens cologne display. The one on the right is also from a swap. I did fancy it up a little using these:


I found them at a dollar store (Dollar General, I think).  These are actually fingernail decals and come with an adhesive backing. They can be a little frustrating to work with because they stick to everything...including fingers and tweezers.  But it was worth the effort.  This strip was wide enough to cover the edge of the glass and added a little pizzazz.

Well, I don't mean to post and run but we're leaving for vacation in a day or so and I still have lots to do.  When I get back, I hope to have a tutorial on a different way to make french hook earrings and my way of making a beaded angel.

Take care!


Friday, September 4, 2015


I really wanted to post long before this but about 2 weeks ago, I had a nasty visitor...the toothache from Hell!  It laid me low for about 10 days even tho I was taking antibiotics and pain pills. Finally got the ok to have my tooth pulled and now I'm recovering... slowly.

During that time, I pulled out all my UFOs of which I have 12 (that I need for Katelyn's Crossing) and was able to finish up quite a few. First came the necklace displays that will going into the gift section of my Christmas shop. The first two are from gifts I received from two wonderful ladies from one of my Yahoo groups.  The displays are made out of left over craft foam (from when I made a bunch of flip-flops)  Easy to cut and inexpensive.


These two minis below are what I came up with and am happy at how well they turned out.


Here is the template I used with some changes.  I did elongate this to make it taller and cut off the side flaps. I used a piece of  folded 
cardboard to prop it up with. 
.


Just for the heck of it, some of you may find the guide below interesting.
                                        

While I had all my jewelry findings out, I made some candle sticks.

I really like the tarnished look and as an extra bonus, they don't tip over!

Finally, I painted some bead caps to look like fancy bowls.  The blue one looks like sterling silver with turquoise inlays.


Most of these minis went real fast.  I had already put all the beads and supplies I needed in individual boxes so it was just a matter of some cutting, assembly and maybe a little paint.  But the 
Christmas ornaments I'm making now will take a little longer.

Well, that's about all for now.  I hope you all have a safe and enjoyable weekend!

Diane

Monday, August 3, 2015


The last of our summer visitors left last week and I was sad to see them go.  My daughter, son-in-law and grandson were here for only 4 short days but we had a great time. Boating, going to the beach, water park, rafting and....miniatures!

One of our miniature adventures is when Matthew and my daughter Sandra, made their own fairy doors.
They did all the painting, decorating, attached the leather hinges and since the door opens, added a backdrop. I think they did a wonderful job!


After dinner one night, my grandson told me that he "noticed" an empty dollhouse (Katelyn's Crossing) and wanted to know what I was going to put in it. So I bought it into the living room along
with all my Christmas minis and he began to arrange them the way he wanted. Here is what he came up with.


I know a lot of people wouldn't let a nine year old kid handle their minis, but in Matthews case I had no reservation. He had handled some minis the year before and not only was he very careful but very respectful.  Besides that, he didn't play with them.....not in the same way kids play "lets pretend" with Barbie and GI Joe. He simply arranged them.  Once he got it the way he liked it, he was done. Altho he knows this isn't the final arrangement (I have to make some displays), that was OK....
as long as I waited til his next trip down so he can help.

Yesterday I went to Hobby Lobby and picked up some water-slide decal paper.  I have wanted to make my own decals for a long time because I have no artistic ability as far as painting and drawing are concerned.   I can use this for so many things,  Decorating furniture, jewelry boxes and making stained glass.  But I decided to start out with something small...a garden sign.  At first I did an experiment on some scrap wood and was very pleased at how it turned out.  But then became very displeased after everything dried.  The edges of the decal turned up!


Does any one in blogland who has worked with decals know what may have happened?  I followed direction precisely.  Any help is truly appreciated.  Until I figure something out, I'm going to set it aside for a while.  Will let you know what happened in my next post.

Have a great day everyone!

Diane

Monday, July 13, 2015

Shadowboxes


I am pretty much over my fettish concerning shadowboxes- at least for now.  Back in March, I showed you a rather beat up shadowbox a friend of mine gave me and now I want to show you what I did with it.


As you can tell from the first picture, there was no backing and the color of the wall showed through.  I wanted to kick it up a notch so I got out all my paint chips, wallpaper samples and scrapbooking paper to see what I could come up with.  I am very happy with the results but figuring out what color should go where, can drive a person crazy

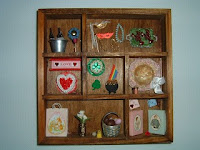
Here are some shadow boxes I completed a while back along with my printers box


So why so many shadowboxes?  Three years ago when we moved into a larger house, I wast lucky enough to have a spare room as my very own craft room.  When I unpacked a tote full of minis that I knew hadn't seen the "light of day" for a very long time, I thought it was a real shame I couldn't show them off somewhere.  So I made the 4 shadowboxes you see above (which barely made a dent in my collections). Then came the Halloween roombox (not shown), next was the printer's tray, and finally this last one.  This has freed up some much need shelf space which, of course, is full again.

Some of the things that are going in this shadowbox are "onesies"-minis that have no home, swaps that I may or may not use, duplicates of things I made, and many minis that I purchased some time ago for no particular reason.

The nicest thing though, is that I have plenty of wall space on which to hang them!

Till next time, enjoy the summer!

Diane


Tuesday, April 28, 2015

Butterfly house

It's been longer than I thought between posts but I decided to take some time off from minis.  You know the story, yard work, spring house cleaning and guests.  It's funny how kids equate "spring break" with "Gramma's place in Florida"  Had a wonderful time!

When I did get back to minis, I decided not to go back to where I had left off but instead to do something a little whimsical... a just for me project.  I just wasn't sure what.  So with coffee in hand, I went and sat down on my back porch and began to go thru my HBS catalog.  Then something caught my eye.  A beautiful yellow butterfly.  So I decided to make a butterfly house. 

The first time I saw a butterfly house upclose was about 5 years  ago when I went to a craft show.  A couple had tables full of bird houses and bird feeders with just a few butterfly houses at one end.  I stood there quite a long time watching the lady paint beautiful floral designs on the sides and backs.
A swirl of the brush here, a flick of the wrist there and a couple of "loop de loops" and she was done. On the butterfly houses she used much brighter colors.

I asked the man if butterflies actually used theses houses and surprisingly he said "Yes, occasionally they do"  Most butterflies have short lifespans during the summer, some migrate south (like the monarchs who winter in Mexico) and others hibernate in the winter and these are the ones that use the houses.  But for best results, they need to be placed in a wooded area instead of a flower garden.
And I am very lucky to have woods next to my back yard!  First you pound a stake in the ground, mount the house on top, and finally, plant some colorful flowers around the stake.  But....I wouldn't do that.  If I start pounding a stake in the ground,  the fire ants would attack my toes and ankles.  If I was able to dance around them and mount the house on top of the stake, I'm sure that would be plenty of time for the flying critters (the ones with teeth and stingers!) to do lunch...on me.  And I wound definitely not plant flowers around the base of the stake because I have a real fear of pygmy rattlers.

However, I could do something like this.  I'd get everything ready and with my hubby's help, just zip into the woods, set the planter down and zip right out.  10-12 seconds, tops.


This I made out of fimo because it just happen to be out and close by.  I didn't have much to trim it with but came up with ground green foam, micro beads, pre-punched flowers and quilling paper.   Whimsy I wanted and whimsy I got.  I have two others almost done and will post pictures when I can.

I'm  really sorry there isn't much more for me to write about but hope you enjoyed this.  If anyone else has made a butterfly house, please let us know.  Would love to see pictures.

Take Care

Diane

Tuesday, March 17, 2015

Shadow boxes

Hello everyone!  I hope all of you are doing well and not suffering too much from cabin fever.  It's been a rough winter.

In my last post I showed you the printer's tray my friend Shelly gave me.  I have a few pics just to give you a general idea of what I'm doing with it and how far I've gotten- which isn't very far.


This arrangement is just temporary for now.  After I cleaned it up, I needed to see what would fit and what wouldn't. Some of these minis will be used in Katelyn's Crossing ( my current big project),some are duplicates that I made for myself and others are swaps that just need a good home


There are a total of 88 compartments and I could fill them all.  But once I rearrange things I might leave a few empty.  So far, I really like this idea.

I don't want anyone to think I've gone shadowbox crazy, but here are a few more things Shelly gave me. Her son got them for her several years ago but she didn't do anything with them except but them in a garbage bag and stored them in her garage.
She did say some of them were in pretty rough shape and she's right.  Altho they are sturdy, the paint job is not good

These are perfect for 1/4 scale but I don't do that size.  The only one I'm interested in is the barn.  So I just might pass these on to someone else.

And finally, there is this

This really pretty sad,  The paint job is really bad and it needs lots of sanding.  The only reason I'm considering this is because the shelves are deeper and compartments are bigger;  I guess I have my work cut out for me.

I have company coming in a few days so no minis for me for a couple of weeks.

BTW, if anyone needs a little encouragement or feeling down and out, you might enjoy this video. I love it!


https://www.youtube.com/watch?v=fvdivB5kTUU


Take care
Diane