Hello dear readers and fellow bloggers! I hope your Christmas Day is starting out well. At our house, things will be a little quiet until we go to an open house this afternoon. My kind of day.
I know I said I wouldn't be posting again til after Christmas, but a fellow miniaturist and blogger has been having trouble signing on to her old blog so she has had to start a new one. Her name is Viv and she is from Perth in western Australia. I am a great admirer of hers because her crocheting and her mini quilts are gorgeous (as are her doll dresses!)
This is her old blog and you can still view it.
http://dollsandminis.blogspot.com/
This is her new blog. Please re-join as a follower at this address. And it would be great if you could spread the word. And be sure to check out her Peddler Doll ( Tues. Dec 17 post) Incredible!
http://anlabydollhouseminis.blogspot.com.au/
Thanks for all your help and enjoy the rest of the day!
Til next time
Diane

Wednesday, December 25, 2013
Sunday, December 22, 2013
Christmas Gifts
Hello and welcome to my blog. And a hardy welcome to my new followers.! I hope you enjoy your visit.!

I wanted to show you all the wonderful Christmas minis I received form a very talent miniaturist, Deb C. I was thrilled to receive these in a swap because, despite my huge collection of Christmas minis, I don't have any of these! Everything is so beautifully detailed. I gave up on gingerbread men a long time ago-just could not get them uniform. The cherry cheesecake, pumpkin pie, Christmas cake and cupcakes are things I haven't tried to make but I am now inspired. The candles are so delicate, they will be on my fireplace mantle. And the floral arrangement will be the centerpiece on dinning room table. Thank you so much Deb!
About this time each year, I think about my New Year's Resolutions list. This list is a little different than most I have done because it is only about minis. It's divided into 3 parts. The first is an on-going list of the supplies I need or will need soon. Fimo, paint brushes, etc. The second part is what I call "spur of the moment" ideas. These are ideas that pop up in my head at the most inconvenient times and I need to make a note of that idea right then or I'll forget it. For example, my Fishing cabin is about 70% done. I was outside talking to my neighbor when the idea that I needed a fishing creel just popped into my head. Ever happen to you? Luckily, our conversation didn't last long so I remembered long enough to write it down Now the third part of this list is subject to change "without notice". It is a list of new projects, unfinished project and things I want to learn. I allow myself all sorts of flexibility with this and do not put myself in any type of timeline. So what's this have to do with anything? Well, last summer I posted that I had hoped to start a new dollhouse in October but it never happened. So that is now somewhere on the bottom of my list
in favor of....this

This is not a dollhouse but a display of some sort shaped like a dollhouse. I have no idea what this was for but I found it at a Flea market for only $5.00. This may be the answer to my problem of what to do with all my minis still stored away after 2 years. It's barely 30" tall but I think it will work because it is so open. It's very light weight and you can see it's put together with nuts and bolts. I don't know which is front or back but that's a good thing. I'll just decorate both sides as front. There is one other unique feature...it has carrying handles!
 I won't be using the handles to move it so I'm thinking skylights? The possibilities are endless. It did occur to me that I will have to prop this thing upside down to paint the ceilings.
This will be my last post til after Christmas so I want to thank all of you for your support, encouragement and kind comments. Whether you are a follower or an occasional visitor, your friendship means the world to me

I wanted to show you all the wonderful Christmas minis I received form a very talent miniaturist, Deb C. I was thrilled to receive these in a swap because, despite my huge collection of Christmas minis, I don't have any of these! Everything is so beautifully detailed. I gave up on gingerbread men a long time ago-just could not get them uniform. The cherry cheesecake, pumpkin pie, Christmas cake and cupcakes are things I haven't tried to make but I am now inspired. The candles are so delicate, they will be on my fireplace mantle. And the floral arrangement will be the centerpiece on dinning room table. Thank you so much Deb!
About this time each year, I think about my New Year's Resolutions list. This list is a little different than most I have done because it is only about minis. It's divided into 3 parts. The first is an on-going list of the supplies I need or will need soon. Fimo, paint brushes, etc. The second part is what I call "spur of the moment" ideas. These are ideas that pop up in my head at the most inconvenient times and I need to make a note of that idea right then or I'll forget it. For example, my Fishing cabin is about 70% done. I was outside talking to my neighbor when the idea that I needed a fishing creel just popped into my head. Ever happen to you? Luckily, our conversation didn't last long so I remembered long enough to write it down Now the third part of this list is subject to change "without notice". It is a list of new projects, unfinished project and things I want to learn. I allow myself all sorts of flexibility with this and do not put myself in any type of timeline. So what's this have to do with anything? Well, last summer I posted that I had hoped to start a new dollhouse in October but it never happened. So that is now somewhere on the bottom of my list
in favor of....this

This is not a dollhouse but a display of some sort shaped like a dollhouse. I have no idea what this was for but I found it at a Flea market for only $5.00. This may be the answer to my problem of what to do with all my minis still stored away after 2 years. It's barely 30" tall but I think it will work because it is so open. It's very light weight and you can see it's put together with nuts and bolts. I don't know which is front or back but that's a good thing. I'll just decorate both sides as front. There is one other unique feature...it has carrying handles!

This will be my last post til after Christmas so I want to thank all of you for your support, encouragement and kind comments. Whether you are a follower or an occasional visitor, your friendship means the world to me
So from my house to yours,
Merry Christmas and a Happy New Year
Best wishes to all,
Diane
Sunday, December 15, 2013
I'm Ready!
Yes, I am all done and well prepared for Christmas (except for baking cookies). It was a lot of fun decorating this year because I made it practically stress-free. In years gone by, I would haul out just about every "Christmassy" thing I had, take down my other nic nacs, pictures, etc and put them away for a month. The first week in January I would have to reverse the process and sometimes I had a real mess on my hands. First of all, I won't be hosting any parties. The den and the dinning room are the only two rooms I decorated because they are the first two rooms you see when you enter my house. So, if someone stops by, at least I have something up. Secondly, it's just going to be my husband and I for the most part. I am very content with having nothing in the bathrooms, living room or bedrooms. Some people will consider this "Scrooge like" but I call it stress free. There are, however, a few things I put up every year without fail. My Nativity set and...my Christmas tree collection.. This picture is my all time favorite. It is nearly 12" tall and 7" wide so I think it's better suited for playscale


I wish I was a better photographer because this picture does not do it justice. Hopefully, you will be able to enlarge it. I have made quite a few of these through the years ( in various colors ) and did really well at craft shows. But then in the early 2000's, I gave up craft shows altogether. I still have quite a few "naked" trees left and in smaller sizes so may try to sell some over the internet. I hope you like this a well as I do.
In the next few months, I will be changing the look of my blog a little. You may have already noticed the I went from a two-column template to a three-column one. I wasn't sure if I could do this but I was successful.
I have also started a Twitter account and although i haven't tweeted much yet, I will in the future
Take care and have a wonderful Holiday!
Til next time
Diane
Saturday, November 30, 2013
Wreaths
Wreaths, wreaths, and more wreaths. I don't have a lot to show you right now but here are a few I have collected or made over the years.
This first one is a country-style wreath made out of wire that I received in a swap in the late 90's. It has long resided in my flower shop, The Ashley.

The Halloween wreath I made from wire and is also in the Ashley.

This one is from artificial garland twig, trimmed and decorated

Twine- Two cardboard discs glued together and wrapped in twine

Here's how I made the round wire wreaths

For the round wreaths, you need:

wire cutters
wire- I used 26 gauge green wire that comes on a paddle. Thinner wire is better but this is all that I had on hand. Use the longest length you are comfortable with. I used 4-5 length of 18" each. It will all depend on how thick and big you want your wreath.
Round shape or form- a dowel will work but anything round is ok. I used a cosmetic container
( lg with a 1" diameter), a small fingernail polish container (med- 3/4" diameter ) and a dowel ( small, 1/2" diameter)


Wrap the wire around the form 5-6 times but leave a tail at each end. Slide wire off the form . Hold the wreath gently and let it expand so you have an irregular round shape. Now start wrapping each tail around the diameter of the wreath. Do not pull the wire too tightly because you will loose the irregular shape. Tuck in or cut off the ends so you don't get poked.

Take another piece of wire and just start wrapping. Make a kink, leave a gap, twist the wire back on itself, etc. To make the wreath heavier or thicker, use more wire until you're happy with the size.

Once done, trim off the ends and start decorating!

The heart wreaths are done a little differently.
You will need all of the above supplies plus a very small crochet hook. (sorry, but I don't recall the sizing). We will be using the "barrel" and not the hook itself.
Wrap the wire around the form only twice. Let the wire expand. You will have 2 very long ends so wrap them around each side of the circle only twice. It is a lot easier to shape when you're working with only 2 wires rather than 4-5.
Put your forefinger and middle finger (not your thumb) inside the wreath. Visually find the midpoint and place the barrel of the crochet hook on top of the wire and pull down. It should look something like this.


I hope you enjoyed this tutorial and have fun making lot of wreaths. After Christmas, I'll show you the ones I made for Valentine's, St Pat's and Easter
Well, I off now. Today I plan to set up my tree and to some decorating so no minis today.
Till next time
Diane
Friday, November 8, 2013
The "Naturals"- Part 3
Hello! I hope everyone is enjoying the fall weather. And a sincere welcome to my new followers! I have been very neglectful in saying "Hi" but your friendship means a lot to me. Please feel free to comment or email me with any questions.
This will be the last post ( for the time being) about using natural material, courtesy of Mother Nature. I still have a few more ideas but need to go on to other things.
This is what I have been working on for the past week. A floor lamp, table lamp, and two different bird houses. Also, shells filled with salsa and guacamole, an acorn caps with chips, and finally a coconut made from an acorn shell.

These were fast and simple minis to make ...except for the rectangular birdhouse. That was kind of interesting.

I made it out of pine bark from the mulch we have around our house
Since it has so many layers, I used a small crochet hook to separate them into the thickness I wanted. The really cool thing about this was the different colors, shading and textures of the wood.

But before you begin, be aware that sometimes a layer or two of the bark may separate all by itself, no matter how gently you handle it. It's only a matter of gluing it back on and only takes a few minutes.
So, here's how I did it.
First step, swish a piece of bark around in warm, soapy water. Immediately rinse in cool clear water and blot with paper towel. Let dry at least overnight. Then separate the layers into the thickness you want using a crochet hook or something similar.
 While it's drying, make a birdhouse pattern out of very thin cardboard. Now, pick out 7 pieces of bark, larger than your pattern, varying the color and texture ( it will make it very unique!) Glue your pattern onto the bark pieces, weight them down and let dry, probably an hour or so. Next, cut out your pattern. Be sure to leave a very small margin around each piece so it glues together properly. You don't want the cardboard in the way. Take the front part of the birdhouse and drill a hole for the opening. If you don't have a drill, maybe a black marker or paint will do. So now you can start assembling the birdhouse.
BUT...
You might want to note that finding a base piece that is flat so your house won't tip over, may be kind of hard. You can either use a small painted piece of cardboard as the base or you can make it a hanging birdhouse (which is what I did) I took a 6" piece of raffia, inserted about 1/2" inside the birdhouse and then glued on the roof pieces, effectively trapping the end inside.
I used a fairly thin-bodied glue because I hoped it would sink in between the layers and make them stronger. Be generous with the glue. Add a little perch and as the final step, spray with a sealer.
Now, an update on my leaves on fairy chair (see the Naturals-Part 1 from Oct 14). I was to say the least, disappointed. I felt sure the leaf that I preserved in wax paper would last a lot longer but it changed color and withered up within a few days. I guess you can't stop Mother Nature.
Well I'm off. Time to finish up some swaps and get serious about Christmas
Til next time
Diane
This is what I have been working on for the past week. A floor lamp, table lamp, and two different bird houses. Also, shells filled with salsa and guacamole, an acorn caps with chips, and finally a coconut made from an acorn shell.


I made it out of pine bark from the mulch we have around our house
Since it has so many layers, I used a small crochet hook to separate them into the thickness I wanted. The really cool thing about this was the different colors, shading and textures of the wood.

But before you begin, be aware that sometimes a layer or two of the bark may separate all by itself, no matter how gently you handle it. It's only a matter of gluing it back on and only takes a few minutes.
So, here's how I did it.
First step, swish a piece of bark around in warm, soapy water. Immediately rinse in cool clear water and blot with paper towel. Let dry at least overnight. Then separate the layers into the thickness you want using a crochet hook or something similar.

BUT...
You might want to note that finding a base piece that is flat so your house won't tip over, may be kind of hard. You can either use a small painted piece of cardboard as the base or you can make it a hanging birdhouse (which is what I did) I took a 6" piece of raffia, inserted about 1/2" inside the birdhouse and then glued on the roof pieces, effectively trapping the end inside.
I used a fairly thin-bodied glue because I hoped it would sink in between the layers and make them stronger. Be generous with the glue. Add a little perch and as the final step, spray with a sealer.
Now, an update on my leaves on fairy chair (see the Naturals-Part 1 from Oct 14). I was to say the least, disappointed. I felt sure the leaf that I preserved in wax paper would last a lot longer but it changed color and withered up within a few days. I guess you can't stop Mother Nature.
Well I'm off. Time to finish up some swaps and get serious about Christmas
Til next time
Diane
Friday, October 25, 2013
Stolen Teddy Update
We do have more information about the Teddy Bear that was stolen. Here is the description: (please see my post from yesterday)
The bear had light
tan mohair fur,was dressed in a micro light blue and white check
with a white sailor collar that extended over his back and
shoulders. He had a little hump back because he was seated. One
of his paws had a little embroidery mark on it, a small flower.
He was about 3" seated and his silhouette was pear shaped because
he was a little bottom heavy. I think the maker was Lorraine
Gardner, but I am not sure. Lorraine Gardner made beautiful
miniature bears and rabbits with swivel arms, legs and heads.
I need to have somebody send me a really good picture of this
exhibit, where they had taken the picture Saturday morning. A
teddy bear was stolen from the exhibit Saturday afternoon that
was sitting in the white chair next to the front door. The
exhibit belongs to Rhona Lee, and needless to say she is
heartbroken. The bear was very expensive, and she had been saving
him to include in a special project. She does not have a picture
of him, so I was hoping one of you had taken a good picture of
the exhibit Saturday morning that shows the bear. Rhona doesn't
care who did it, she just wants the bear returned.
Rhona's address is (she gave me permission to give it out):
Rhona Lee
1455 Welburn Ave
Gilroy, CA 95020
408-847-2065 rhonalee@aol.com <mailto:rhonalee@aol.com>
We also do have a picture although it's small and you will have to go here to see it
https://conniesauve.shutterfly.com/7044
If any of my followers would be able to take a few minutes to put this message on your blog, it would be appreciated. Teddy wants to go home!
Til next time
Diane
Thursday, October 24, 2013
The "Naturals" Part 2
Shells, shells, and more shells. Can you tell from my blog background that I love shells? But before I continue, I want to say that most of the minis I'll be showing were not from any beach I went to. I had to purchase most of them. Some beaches are great for shelling, others are not. I have never found a coral, sand dollar, starfish, seahorse, driftwood or sponge washed up on any shore. I have found shark's teeth, clam and scallop shells, black mother of pearl, snails and a variety of "conch" type shells. Never the less, I want to show you what I made.

These 3 plaques are made out of Fimo I varigated to look like colors of the ocean. On the largest one, I put my last seahorse. It's a little less than an 1" and my very favorite "shell" The next one is the smallest sand dollar I have left.and is about 5/8" long. On the last plaque is a snail, sponge, a cone type shell and a starfish. The starfish is 1/4" wide and I have never found any other quite as small.
 To give you an idea how small the clam shells are:


These 3 plaques are made out of Fimo I varigated to look like colors of the ocean. On the largest one, I put my last seahorse. It's a little less than an 1" and my very favorite "shell" The next one is the smallest sand dollar I have left.and is about 5/8" long. On the last plaque is a snail, sponge, a cone type shell and a starfish. The starfish is 1/4" wide and I have never found any other quite as small.


Next, a picture is of my real sponge that I bought off of a sponge fisherman from Tarpon Springs (Florida).

My sponge in miniature.

These last two pictures are from some previous posts showing how many minis I was able to make ( Please see post about "Matty's Blue Seas Bistro, 1,2, and 3 )
I hope you've enjoyed this post and maybe have gotten some inspirations on working with shells.
Unfortunately, I am ending this post on a "sour note" It appear that there has been another stolen miniature.
Here is the post from one of my mini groups and I do have permission to post it here.
A teddy bear was stolen from the exhibit Saturday afternoon that was sitting in the white chair next to the front door. The exhibit belongs to Rhona Lee, and needless to say she is heartbroken. The bear was very expensive, and she had been saving him to include in a special project. She does not have a picture of him, so I was hoping one of you had taken a good picture of the exhibit Saturday morning that shows the bear. I would like to post a picture of the bear online and hopefully she will be able to get him back. Rhona doesn't care who did it, she just wants the bear returned. I will post a picture of the bear if I receive one.
Rhona's address is (she gave me permission to give it out):
Rhona Lee
1455 Welburn Ave
Gilroy, CA 95020
408-847-2065
Taken from the Good Sam show October 12,13 in San Jose. Ca. So, this is a plea to the person who took this teddy. Please return it. Just think how good you will feel, when working on your minis, knowing that you did the right thing
Till next time
Diane
Monday, October 14, 2013
The "Naturals" - Part 1
Being a "Trash to Treasures person", I am always on the lookout for all sorts of supplies, courtesy of Mother Nature. Every state has all sorts of natural ingredients that can be adapted to miniatures. But when I lived in Illinois, for some reason, I never really bother to look for them. But since I moved to Florida, I found a whole "nother" world.
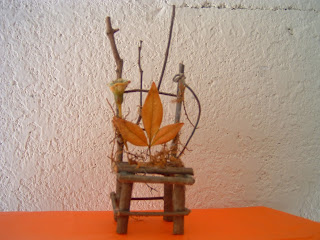
The fairy chair I received in a swap a while back but didn't come with the leaf back. I added that yesterday to dress it up a little. This is where I got it from.
 I don't know what this bush is called but I named the "garbage tree" Even when its trimmed up, it still looks kind of shabby.. Very popular here in Florida. But look what I got from it


The neat thing about this bush is that the leaves turn colors throughout the whole year and they come it all sizes. The smallest ones are perfect scale for any fall scene you may want to do.
And here's how you preserve them
You will need 2 pressing cloths ( I think any scrap piece of fabric will do)
Two pieces of wax paper
Leaves
Iron
Lay down one pressing cloth. Lay 1 sheet of wax paper on top. Then lay your leaf on top that. Now lay the 2nd piece of wax paper on top of the leaf. Finally, the 2nd pressing cloth goes on top the wax paper.
Set you iron on DRY HEAT- low temperature. Now, just start ironing, using a circular motion (don't forget the stem) It will take about 8-10 seconds. When done, immediately separate the layers and gently remove the leaf. What you've done basically is coat the leaf in wax to preserve it. I'm not sure how long it will last but I should think quite a long time.
But Wait! There's more! I also got these:


The seeds dry on the stem and turn into "miniature apples" Perfect size and color.
.


The fairy chair I received in a swap a while back but didn't come with the leaf back. I added that yesterday to dress it up a little. This is where I got it from.


The neat thing about this bush is that the leaves turn colors throughout the whole year and they come it all sizes. The smallest ones are perfect scale for any fall scene you may want to do.
And here's how you preserve them
You will need 2 pressing cloths ( I think any scrap piece of fabric will do)
Two pieces of wax paper
Leaves
Iron
Lay down one pressing cloth. Lay 1 sheet of wax paper on top. Then lay your leaf on top that. Now lay the 2nd piece of wax paper on top of the leaf. Finally, the 2nd pressing cloth goes on top the wax paper.
Set you iron on DRY HEAT- low temperature. Now, just start ironing, using a circular motion (don't forget the stem) It will take about 8-10 seconds. When done, immediately separate the layers and gently remove the leaf. What you've done basically is coat the leaf in wax to preserve it. I'm not sure how long it will last but I should think quite a long time.
But Wait! There's more! I also got these:


The seeds dry on the stem and turn into "miniature apples" Perfect size and color.
.
And finally this

This is the stem that the seeds come off of. I intend to use this as a filler in a bouquet. All I have to do is put on a dot of white paint on the ends and trim it up. Kind of like Queen Ann's Lace.
I hope this post gave you some ideas on using natural material in you minis. The best thing is that it's a renewable resource!
Til Next Time
Diane
Tuesday, October 1, 2013
For Halloween...
Finally finished this room box last night and I have to say that it was really fun to do Room boxes can be addictive so I just may have to make a lot more than I planned
First, the inside- This was the easiest part to do and turned out pretty much like I planned. I think it shows off most (but not all) of my Halloween minis along with some fall decor. I have plans for the remaining minis and will be working on that scenario next


The outside lid took the longest.
I experimented with the colors. I had 6 shades of gray (not 50 like the book, just 6) and after deciding on the main color, I used the others as accents. I practiced making the stormcloud freehand on scrape paper and when it was do-able, I was able to copy it to the lid. I did use some chalk pastels for blending. The lightening is embroidery floss, stiffened, shaped and glued on.
The witch is free clip art printed off my computer and decoupaged on.
 The bats are plastic from a "Mardi Gras" type necklace we got last year at a party, They're a bit large but I consider them "mega-bats"
 Here is a close up of the lightening.
For the inside lid- same color gray as the outside and I added another moon. Two of the more unique
minis you see here are a wonderful door and a rock with a face- a talking rock Cool.
The ghosts are tissue paper and are opaque. You can kind of see thought them, which is what I wanted.
Now, not only have I taken my swaps and gifts out into daylight again, but I've made myself some extra room. All in all, I am very pleased. Hope you like it!
My next project is well underway and I hope to have it done in the next few days. So until next time, take care
Diane
First, the inside- This was the easiest part to do and turned out pretty much like I planned. I think it shows off most (but not all) of my Halloween minis along with some fall decor. I have plans for the remaining minis and will be working on that scenario next


The outside lid took the longest.
I experimented with the colors. I had 6 shades of gray (not 50 like the book, just 6) and after deciding on the main color, I used the others as accents. I practiced making the stormcloud freehand on scrape paper and when it was do-able, I was able to copy it to the lid. I did use some chalk pastels for blending. The lightening is embroidery floss, stiffened, shaped and glued on.
The witch is free clip art printed off my computer and decoupaged on.
 The bats are plastic from a "Mardi Gras" type necklace we got last year at a party, They're a bit large but I consider them "mega-bats"
For the inside lid- same color gray as the outside and I added another moon. Two of the more unique
minis you see here are a wonderful door and a rock with a face- a talking rock Cool.


The ghosts are tissue paper and are opaque. You can kind of see thought them, which is what I wanted.
Now, not only have I taken my swaps and gifts out into daylight again, but I've made myself some extra room. All in all, I am very pleased. Hope you like it!
My next project is well underway and I hope to have it done in the next few days. So until next time, take care
Diane
Wednesday, September 25, 2013
Hello again! I really hope everyone had a good summer and that you are looking forward to a great fall season.
And a hardy Welcome to my new followers! It is nice to "meet" you and I hope you enjoy my blog. Although I'm terrible at replying to comments, I do appreciate them.
Fall is my favorite time of year. Even in Florida we see can the trees change color, smell the faint smoke of leaves being burnt and a little later in the fall, I will be indulging in apple cider or hot chocolate ( yes, hot chocolate especially in the cooler evenings)

At one time I was a prolific swapper, some one-on-one but mostly central point swaps. I had to quit all swapping about 2 years ago when my hubby and I decided to put our house up for sale. ( I just started swapping again through some of my groups on Yahoo.) The first things to be packed up (while we painted and fixed things up) were mostly my "loose" minis. These were minis that I just set out around the house, on bookcases, curio cabinets and nic nac shelves, etc- just little groupings. So this last week while I straightened out my craft room, it occurred to me that most of the stuff I was moving around were box after box of the minis I had packed away almost 2 years ago! Mainly swaps but also Michael's hutches, House of Miniatures kits and things I had purchased for "my someday" projects. Even though I no longer have the nic nac shelves or bookcase, I do have other options. So, I've embarked on a mission to make some more vignettes and a few roomboxes. Some will be permanent, others temporary. This should keep me busy for a long time. Hopefully I'll be able to show you my Halloween roombox in the next few days. Almost done.
I came across a new blog the other day that I'd like to tell you about. Lisa T has just started blogging and although she may be new to blogland, she is not new to miniatures. I really liked what I saw. Check out her blog and pictures at http://miniaddictions.blogspot.com/ I did not hesitate to become a follower.
Well, that"s it for today. I have to get back to my Halloween roombox, want to show it off before Halloween passes me by
Til Next time
Diane
And a hardy Welcome to my new followers! It is nice to "meet" you and I hope you enjoy my blog. Although I'm terrible at replying to comments, I do appreciate them.
Fall is my favorite time of year. Even in Florida we see can the trees change color, smell the faint smoke of leaves being burnt and a little later in the fall, I will be indulging in apple cider or hot chocolate ( yes, hot chocolate especially in the cooler evenings)

This picture is 1 of 4 permanent "displays" I put together, (before we moved last year) mainly to show off some of my swaps. The other 3 have the themes of winter, spring and summer. I have 5 dollhouses, one vignette ( where many of my swaps, kits and creations are) but no roomboxes.
At one time I was a prolific swapper, some one-on-one but mostly central point swaps. I had to quit all swapping about 2 years ago when my hubby and I decided to put our house up for sale. ( I just started swapping again through some of my groups on Yahoo.) The first things to be packed up (while we painted and fixed things up) were mostly my "loose" minis. These were minis that I just set out around the house, on bookcases, curio cabinets and nic nac shelves, etc- just little groupings. So this last week while I straightened out my craft room, it occurred to me that most of the stuff I was moving around were box after box of the minis I had packed away almost 2 years ago! Mainly swaps but also Michael's hutches, House of Miniatures kits and things I had purchased for "my someday" projects. Even though I no longer have the nic nac shelves or bookcase, I do have other options. So, I've embarked on a mission to make some more vignettes and a few roomboxes. Some will be permanent, others temporary. This should keep me busy for a long time. Hopefully I'll be able to show you my Halloween roombox in the next few days. Almost done.
I came across a new blog the other day that I'd like to tell you about. Lisa T has just started blogging and although she may be new to blogland, she is not new to miniatures. I really liked what I saw. Check out her blog and pictures at http://miniaddictions.blogspot.com/ I did not hesitate to become a follower.
Well, that"s it for today. I have to get back to my Halloween roombox, want to show it off before Halloween passes me by
Til Next time
Diane
Friday, July 26, 2013
Signature Quilt
Hello!. I hope everyone is having a good summer. It's very rainy and hot here in Florida but the sun does come out once in a while
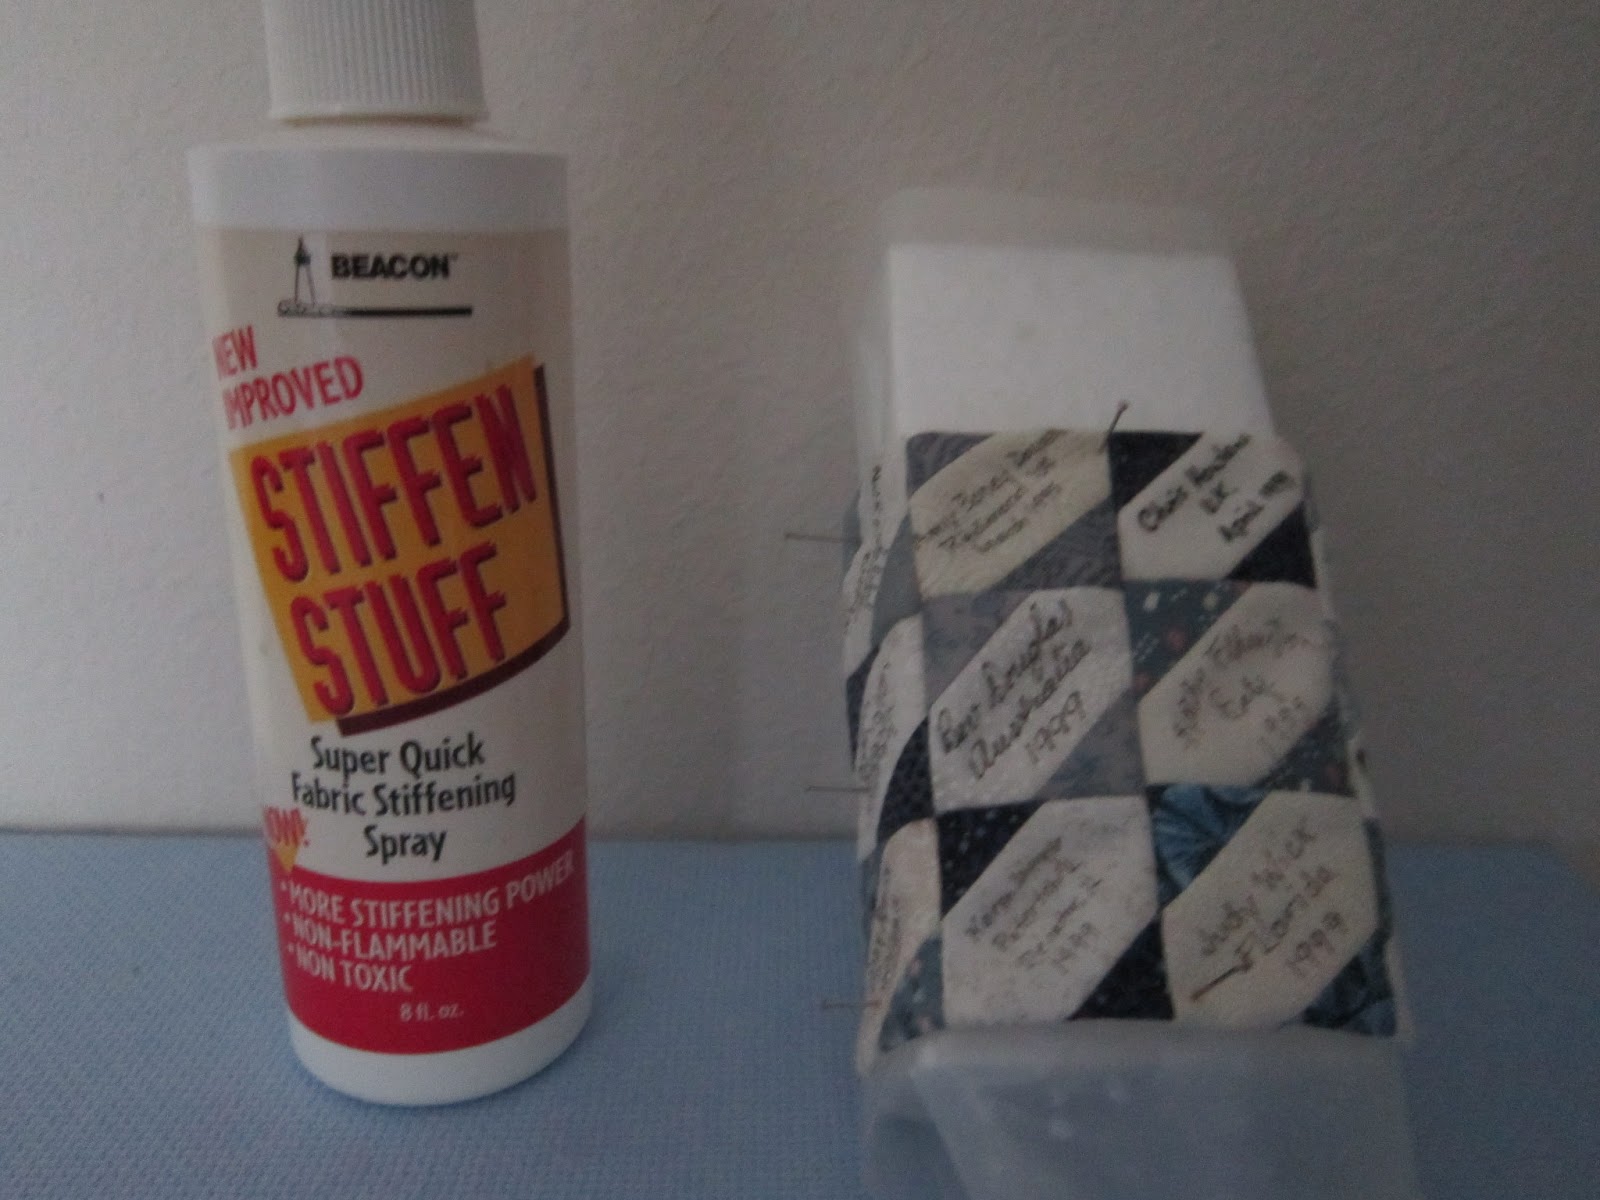
Does anyone out in "blogland" have one of these beautiful quilts? It is from my first swap (AOL scale miniature group) from 1999! and one of my most cherished minis. I know some of the signers are still around because I recognize some names. If I remember correctly, all swappers sent 3-4 squares of small print fabric to a miniaturist in Australia who offered to sew then together for a quilt. We signed it with name, city, state/county and the year. And this is what we got in return. I was so thrilled at how it turned out! For many years it's just been laying on the bed in my lighthouse but the other day I decided to form it to the bed so it would lay more natural.


 .
.
Now it you think this is an endorsement for Stiffen Stuff, you're right.
I also stiffened some bows for a more natural "hanging" look. Just make sure that the pins are inside the loop hole and don't pierce the ribbon. For the tails, cut them 1/2 longer than needed. For these you will be piercing the ribbon. When completely dry, just trim.
Well, this was just a short update as to what I've been up to since my last post. Now, It's vacation time! Til next time...
Diane
Does anyone out in "blogland" have one of these beautiful quilts? It is from my first swap (AOL scale miniature group) from 1999! and one of my most cherished minis. I know some of the signers are still around because I recognize some names. If I remember correctly, all swappers sent 3-4 squares of small print fabric to a miniaturist in Australia who offered to sew then together for a quilt. We signed it with name, city, state/county and the year. And this is what we got in return. I was so thrilled at how it turned out! For many years it's just been laying on the bed in my lighthouse but the other day I decided to form it to the bed so it would lay more natural.


 .
.Now it you think this is an endorsement for Stiffen Stuff, you're right.
I also stiffened some bows for a more natural "hanging" look. Just make sure that the pins are inside the loop hole and don't pierce the ribbon. For the tails, cut them 1/2 longer than needed. For these you will be piercing the ribbon. When completely dry, just trim.
Well, this was just a short update as to what I've been up to since my last post. Now, It's vacation time! Til next time...
Diane
Subscribe to:
Posts (Atom)